Brimbles, brimbles sticker club, hauls, sticker kit

November Brimbles Sticker Club: ‘Not a Creature Was Stirring’

22810284_10212084028629697_261281104_o

It’s Brimbles Sticker Club Time! (and check out the cute new postcard!)

This month’s Club is called ‘Not a Creature was Stirring’, and is a Christmas themed kit featuring lots of cute little Christmas mice.

22833514_10212084027989681_1666634054_o

Let’s look at the each sheet in detail…

First is the decorative sheet, featuring the mice themselves. As always, the sticker club is created with Anna’s original artwork, and the decorative sheet often showcases her talent the best.

22810120_10212084028309689_216350445_o

The mice are called Winston, Cecil, Frankie, Gordon & Horatio. I’ll admit I don’t know yet which one is which, but I can tell you that Cecil is the one with the wrapped gift in his paws, and Winston is the one with the candy cane.

I think my favourite is the little guy who is wrapped up all snug and warm – I feel you little guy, I’m feeling the cold already and it’s still October! I’m also fond of the mouse with his Christmas lights all in a tangle, as I sympathise strongly with  his plight. Every year you wrap up the lights nicely before they go into storage, and then every year when you bring them out again they are in impossible knots – how does this happen? It’s like headphone/ear bud wires but 100x times worse! As such, I very much appreciate his worried little face!

Anyhoo, here are some close ups of the mice:

Ok next is the washi sheet, which has four wider strips, and three slim strips in co-coordinating colours.  I’m particularly loving that holly, it’s such a lovely green colour. Also the mini Winstons of course, so cute!

22810513_10212084028469693_615769256_o

22789975_10212084028389691_1982119006_o

Sheet three is the functional sheet, in classic Christmas red and green.

22768064_10212084028349690_1993007266_o

Although I always love and use the functional stickers, my favourite part of this sheet is the little phrase at the bottom:

22789885_10212084028429692_1454295512_o

I just love the way the font makes it look like it’s been made with a label maker!

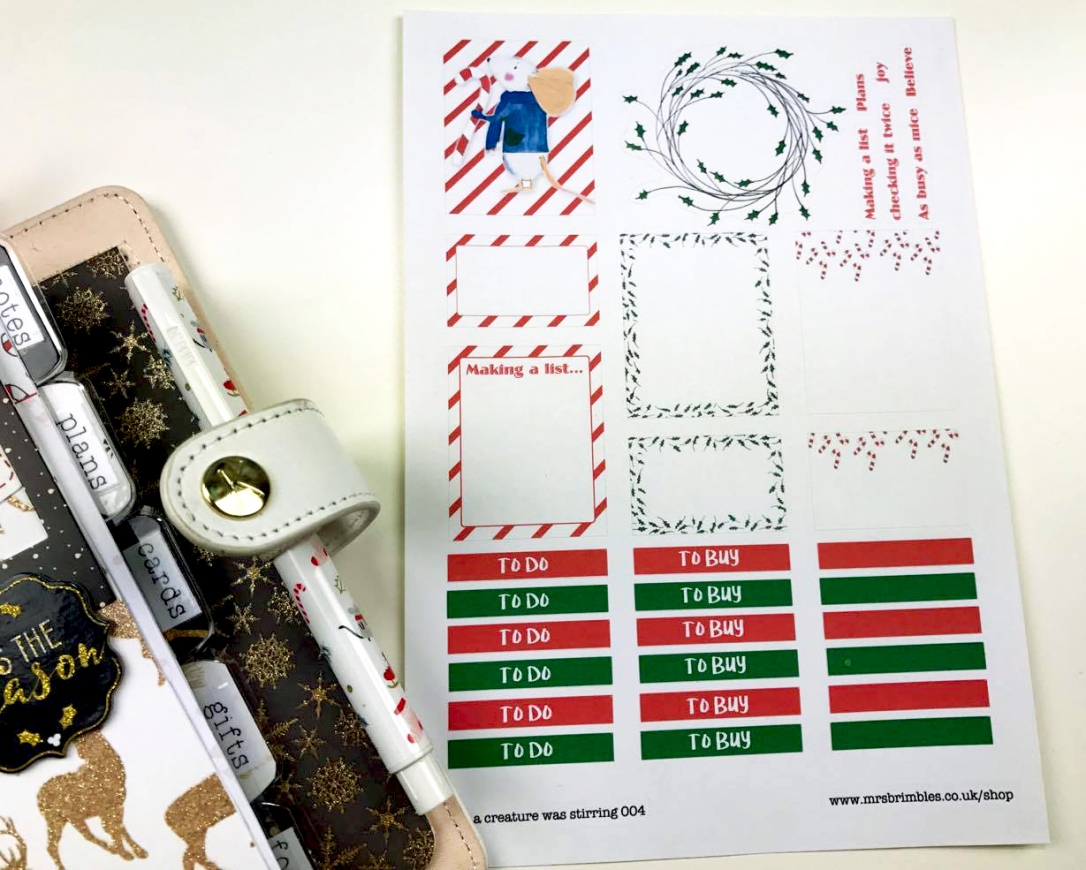
The last sheet is the one that mixes both decorative and functional planning. There’s four ‘full boxes’ – the ‘making a list’ one is a great idea! There’s three ‘half boxes’, then beautiful holly wreath, which you could use in a purely decorative way, or write something in the middle of it to highlight that task or event.

(there’s also a sneak peek of my Christmas planner  set up in this photo too! A video and corresponding blog post on this is coming soon!)

22790311_10212084028029682_1209450735_o

As ever are the functional headers, with six blank ones that you could add your own heading to, or just use to fill up some space. And last is the handful of Christmas words and phrases – useful for both planning and journalling!

22790122_10212084028109684_1968281111_o

And there we have it! If you haven’t got yours yet you can buy the November Sticker club here, or get next month’s here.

Thanks so much for reading, and remember to keep an eye out for my Design Team blog post either here or on the Brimbles Blog to see what I get up to with these stickers!

cropped-lets-see-if-this-works.png

Grace ❤

@ms.paperlover

card making, how to, papercrafts, tutorial

Creative Process – Pretty Posy Birthday Card

As the title implies, I made this card using the ‘Pretty Posy’ paper pad from Trimcraft’s First Edition range.

21245399_10211696197934172_2138939900_n

(apologies for the price label still on there, but it damages the cover when you try and remove it!).

After choosing which papers I wanted to use, I started on sorting what elements I needed to make the card. First I fussy cut some florals and hearts from two of the papers (which you can see the pile of in the top left of the photo below).

I also tried out a new toy, this rather rudimentary circle cutter I got from The Works for a whopping £2. It isn’t great, but it’ll do for now.

21267453_10211685385183860_178229342_o

You can see here the four main parts of the card: the card blank (a 6×6 one). One 6×6 paper (one of the pearlescent designs), with the centre gutted out to make a frame. Then two papers cut to about 5.5×5.5″ (the green one slightly larger) with circles cut from the middle.

…oh, and the lid that covers the circle cutter’s blade has crept it’s way into the photo too, whoops!

21198504_10211685384983855_164023466_o

Then, assembly! The ‘birthday wishes’ is a cardstock sticker from a Pebbles sticker book – which I now wish I had purchased 2384023 of because I use it all the time for cards and now it’s discontinued, waaaaaah!

It’s also raised up on some foam tape. It was a bit fiddly and took a while to get the fussy cut elements in their right places, and required the combined efforts of foam tape, glue dots, pritt stick, and double sided tape to get the job done.

21175903_10211685384903853_959627399_n

But that’s not the end! I always like to add something to the back and centre of my cards, even if it’s something small, just so you don’t have a beautiful front of a card and then stark white space elsewhere.

So inside I just added some washi tape:

21216221_10211685384623846_1267237523_o

For the back I did a little more, first I cut another paper to 6×6, and punched the corners with a fancy corner punch:

21245439_10211685384743849_709280911_n

Then embossed a ‘handmade with love’ stamp on top of some cut off paper I’d used for the front of the card, stuck a doily behind that, and there we go!

21222496_10211685384703848_1992108225_o

I always find adding something to the back and centre of your card (other than your message, of course), makes a handmade card seem more ‘finished’.

Thanks so much for reading, and look out for some more card posts soon 🙂

21175126_10211685384543844_1467182668_n

Oh I forgot – I added some flat back pearls too!

cropped-lets-see-if-this-works.png

Grace @ms.paperlover ❤