card making, how to, papercrafts, trimcraft, tutorial

Banner Cards with First Edition Let’s Celebrate: How To

4

In this post I’m going to be showing you how to make this fun, but incredibly simple banner cut out card. I’m not good with fancy-fold cards (my brain isn’t mathematical enough!), but I do occasionally like to make cards that are just a *little bit* different.

To make this you will need:

  • an 8×8″ paper pad (or larger). I used First Edition’s new release, ‘Let’s Celebrate’ for mine
  • A sentiment stamp, and decorative stamps if desired too
  • Heat Embossing Equipment (ink, powder, heat tool)
  • Ink Pad
  • 5×7″ white card blank (or white cardstock large enough to make your own)
  • Banner Die 3 x 4.5″ (7.5 x 11.5cm) – if you don’t have this then don’t worry too much!

To Start:

blogpost1

Die cut two banner shapes. If you don’t have the die (my set was from The Works  but they don’t seem to have them available online right now), then not to worry! It’s a very easy shape to cut yourself, just use the measurements listed above.

blogpost2

Back each of your banners on a contrasting paper and cut around leaving a border of a few mm. If you have the appropriate sized die you can just cut that and use it to back the original shape, but I find it easier to do it this way!

blogpost3

Attach the banners to your 5×7″ card blank (I go for double sided tape as my adhesive, but use whatever your preference is). Make sure each banner is at the very edge of the card at the left edge and then on the top and bottom edges.

blogpost4

Cut around the banner shapes using scissors or a craft knife, again, whichever your preference. Be careful to only cut through one layer of card and not the back too!

blogpost5

Cut another contrasting paper to just under 5 x 7″ and attach to the inside of the card.

And that’s it for the card shape! You can now decorate however you wish, but I’ll show you how I did mine to give you an idea.

blogpost6

Stamp and emboss a sentiment on a paper scrap, about 2-2.5″ wide (about 5cm).

blogpost7

Cut the paper you’ve stamped into a smaller square or rectangle, back with a contrasting paper leaving a 2mm-ish border, then attach to a longer, but slightly narrower strip of paper.

blogpost8

Attach to card and finish with some stamping!

It is up to you whether to attach your decorative piece to just one or to both banners, if you attach it to just one then the banners can ‘open’ separately, however…

When you make a vertical card – only attach the sentiment/sentiment cluster to the bottom banner. If you attach it to the top banner then gravity will work against you and it will droop!

This card shape also works great horizontally:

8

6

How super easy is that?! You can then write your message on the inside of the banners or on the back of the card.

3

If you’d like to see some more projects with Let’s Celebrate, then check out the Inspiration Area of Trimcraft’s The Craft Blog.

Grace ❤


card making, how to, mixed media, papercrafts, trimcraft, tutorial

Mixed Media Anniversary Card – How To

1

Hi all! I have a post today to show you how to make this pretty mixed media card. Today is my parents’ 30th Wedding Anniversary, which is the ‘pearl’ anniversary, so I wanted to make something with lots and lots of pearls. Of course you could use this style and techniques to make any sort of card you wanted, and use any papers, but I will list the items I used to help you get an idea of what is needed.

I used:

A3 cardstock

First Edition Sweet Nothings 12×12 Paper Pad

Dovecraft Distressing Tool

Paper Flowers, various colours and sizes

Clear Glass Beads

White thread

Flat back pearls (lots!)

White Gesso

3D Gloss Gel/Gel Medium

I wanted to make a huge card, so I started with A3 white card to create my card blank. The card measures 7.5″ by 8″, so you will need to cut a piece 15″ by 8″, and score down the middle to create your card blank.

2

Matt the front of the card with three contrasting papers, one just under 7.5 x 8″, one 7 x 7.5″, and the front one 6.75 x 7″. Distress the edges of the centre paper.

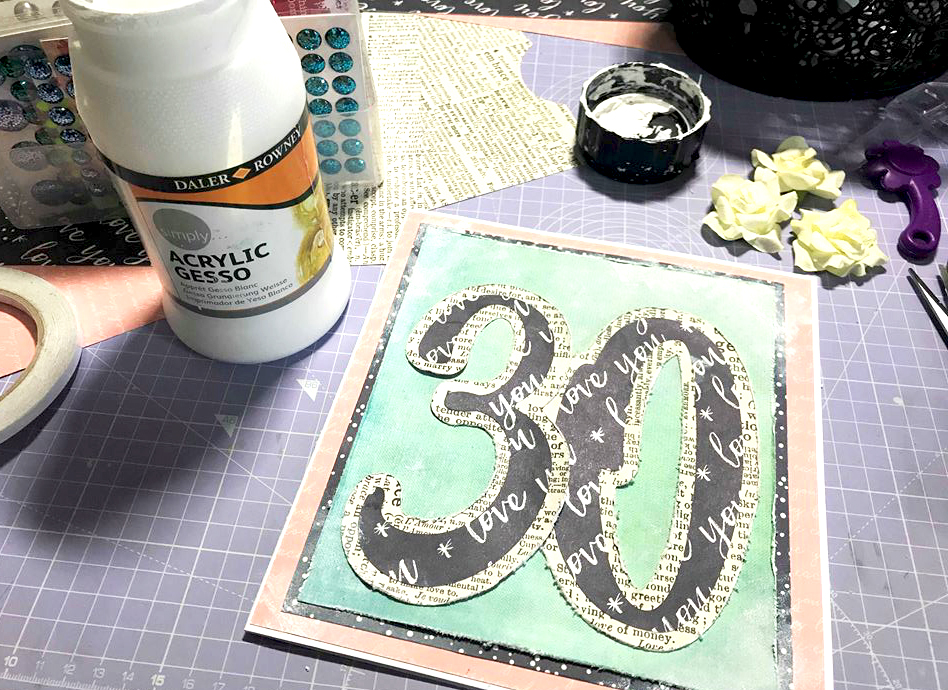
For the centrepiece, I cut the numbers on my silhouette in the font ‘Beyond the Mountains’. I offset the numbers by about 0.3″ and separated the two cut files so the darker ’30’ could be backed by the lighter one. If you do not have a silhouette or other electronic cutting machine you can print out a template and then draw and cut around it, the shapes are not too complicated so it shouldn’t take too long.

3

Distress the edge of the larger 30, then adhere as seen in the photo below, so the numbers slightly overlap and so still leave a border of the green paper underneath. Also so there isn’t an awkward bit of green poking out where the number three ‘dips’ inward on the right edge.

9

Now it’s time for the messy bit, start by lightly sponging some white gesso on the corners of the card:

5

Gather together all your embellishments ready to put on. I also cut the ‘mum and dad’ with my silhouette with pearlescent paper (PEARLescent, geddit?!).

7

Add the gel medium (or other adhesive, you basically want something that will dry transparent with a gloss finish) in the first corner you’re embellishing.

6

Then add the thread, loop it around your fingers, make knots, whatever you like. It will look messy at first but works once all the items are in place and gives a lovely shabby-chic look.

8

Then start adding the rest of your embellishments! You may need to add more gel as you go. Start from largest to smallest. So I started with the large paper flowers, then the smaller pink ones, then large pearls, medium pearls, etc, and finish with the glass beads and tiny pearls to fill in any gaps.

ea

If adding a small title or sentiment like I did with the ‘mum and dad’ cut, then add this at the very end.

Finish by painting a light layer of gesso over the flowers to help tie them in to the theme of the card – if your flowers are white or ivory you may not need to do this, but mine had a hint of yellow which I wanted to hide.

10

The gesso layer also contributes to the shabby-chic effect.

You can dry with a heat tool but I find it better with all these embellishments to leave it overnight to dry.

And it’s finished! One thing to remember with this card, make sure you have an envelope, or the equipment to make an envelope, that is big enough, as it is a BIG card!

f

Thank you so much for reading. If you make your own version of this card then I’d love to see it, so please tag me on social media! Let me know if you have any questions, and if you’re a bit new to or confused by mixed media, then I have a Mixed Media Basics video up on my YouTube channel (it’ll be published a few hours after this blog post), there’s a link to my channel up at the top of this page underneath my logo.

Grace / ms.paperlover ❤

card making, flipbook, how to, papercrafts, trimcraft, tutorial

Wander-Bee Flipbook

Ok, ok, I have been somewhat remiss in my blogging… whoops! The end of 2017 and the beginning of 2018 have been a little ‘aaargh!’ (in both good and bad ways). Now that things are starting to settle down I’m hoping to get back to blogging… and be better than before too.

So enough waffle, on with today’s post. I owed my lovely penpal Julie (instagram: @plannerprettiesandpaper) a snail-mail flipbook. And as I was little behind on my mail to her, I wanted to make something extra special.

The gorgeous Trimcraft collections, Dovecraft’s Bee Happy, and First Edition’s Wanderlust are not necessarily similar, but they have some elements that work together really well. So, the ‘Wander-Bee’ collection was born, and it’s first project, this flipbook:


I didn’t do a process video, or take process photos (otherwise there’d be hundreds!). But I thought I’d go through each ‘page’ of the flipbook with you to tell you how it was made.

The cover is this shaker card. All the hexagons (and all that you’ll see throughout the flipbook) I cut on my silhoutte machine. Due to how busy the shaker element is I only added light embellishments: the bee puffy sticker and gold buttons from Bee Happy, and the ‘hello’, which was from my stash. The only Wanderlust element here is the paper I used to die cut the ‘Bee Happy’. In the shaker itself is a mix of gold sequins and stars, gold glitter, coarse yellow glitter, and copper coloured  micro beads.

12

Next was this simple ‘pocket’ page. To make this I cut one of my (many) pre cut hexagons in half (well, just over), and adhered it to the base with a thin layer of double sided tape around the edges. I embellished it with Bee Happy ribbon and a button, as well as both fussy and die cut elements from both Bee Happy and Wanderlust. You can just see the goodies I put in that pocket slightly out of shot to the top right.

8

This page probably took me the longest to make, as I had to figure out how to make a hexagon-shaped envelope. I tried following an origami tutorial on YouTube but it was WAY too complex. So I just made it up instead. I used brads and twine to keep it shut (it’s full of various die cut shapes and stickers), and decorated around the edge with that slim leaf washi (from my stash). I finished with the sentiment topper from Bee Happy and a Wanderlust fussy cut butterfly.

6

Next was another page with a simple pocket, made in the same way as last time. But this one is more Wanderlust-y. The bow is made with the bow-sewing technique (let me know if you’d like a blog post on that – I have shown it in a video but I can’t remember which one!). In this pocket I put a load of project life/journal cards.

This is one of the back pages, with added envelope flip-out. This one is a real mix of Bee Happy and Wanderlust, and possibly my favourite page. The small envelope (smallest size on the WE R Memory Keepers’ 1-2-3 Punch Board) is mounted on a 4×2.5″ piece of card, which is then attached with washi tape on both sides. The tape isn’t actually from the Wanderlust collection, believe it or not! It’s a Dovecraft tape from last year. The envelope is filled with little stickers.

5

The page at the very back I kept simple, with the three Bee Happy Hexagons and wood veneer piece, and a couple of Wanderlust fussy cut butterflies.

And here’s the finished product:

41

Thanks so much for reading. Check out Trimcraft’s The Craft Blog for more ideas and inspiration with these collections.

Grace ❤ @ms.paperlover


card making, Christmas, how to, papercrafts, tutorial

Super Simple Christmas Crafts 2: Wreath Card (Templates)

5

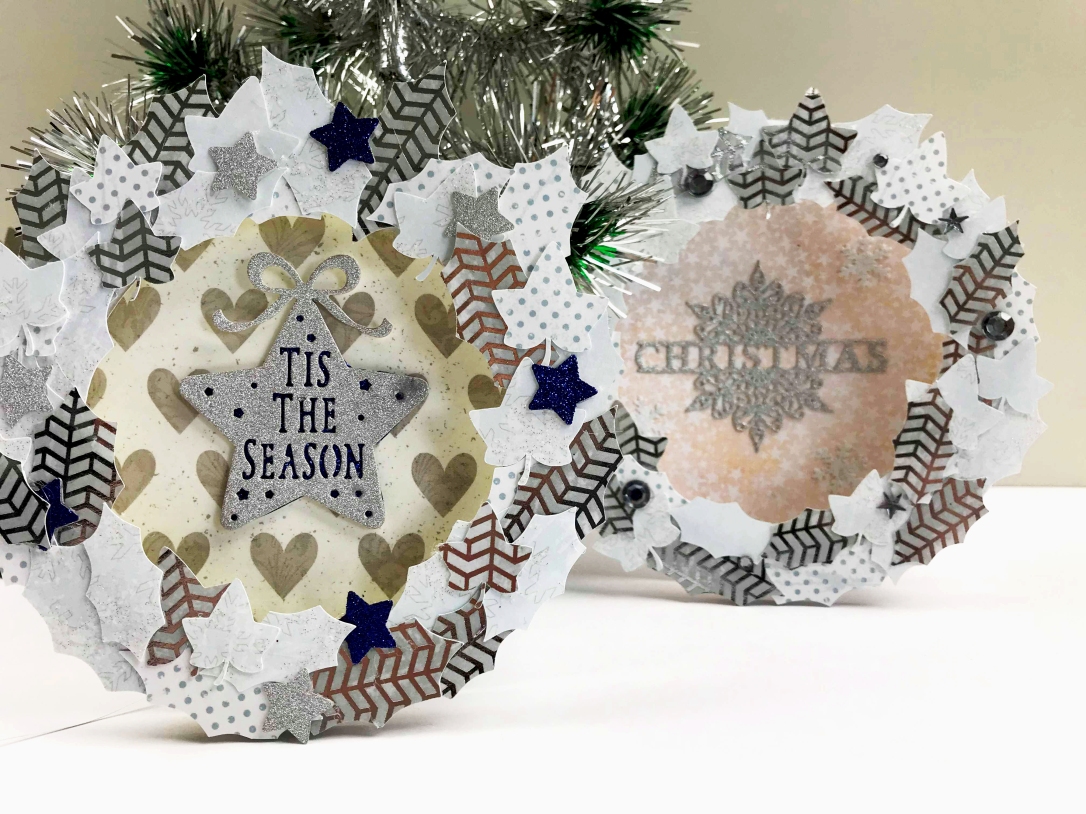
Woop! Another installment of my Super Simple Christmas Crafts! This time making this attractive circle wreath card. You can watch the video tutorial for instructions here;

And here are the templates:

PDFs (for fussy cutting)

CIRCLE CARD BLANK PDF

HOLLY AND IVY LEAVES 1 PDF

HOLLY AND IVY LEAVES 2 PDF

Cut Files (for Silhouette Users):

Circle Card Blank

Holly and Ivy Leaves 1

Holly and Ivy Leaves 2

2

Happy Crafting!

cropped-lets-see-if-this-works.png

Grace ❤ @ms.paperlover

card making, how to, papercrafts, tutorial

Creative Process – Pretty Posy Birthday Card

As the title implies, I made this card using the ‘Pretty Posy’ paper pad from Trimcraft’s First Edition range.

21245399_10211696197934172_2138939900_n

(apologies for the price label still on there, but it damages the cover when you try and remove it!).

After choosing which papers I wanted to use, I started on sorting what elements I needed to make the card. First I fussy cut some florals and hearts from two of the papers (which you can see the pile of in the top left of the photo below).

I also tried out a new toy, this rather rudimentary circle cutter I got from The Works for a whopping £2. It isn’t great, but it’ll do for now.

21267453_10211685385183860_178229342_o

You can see here the four main parts of the card: the card blank (a 6×6 one). One 6×6 paper (one of the pearlescent designs), with the centre gutted out to make a frame. Then two papers cut to about 5.5×5.5″ (the green one slightly larger) with circles cut from the middle.

…oh, and the lid that covers the circle cutter’s blade has crept it’s way into the photo too, whoops!

21198504_10211685384983855_164023466_o

Then, assembly! The ‘birthday wishes’ is a cardstock sticker from a Pebbles sticker book – which I now wish I had purchased 2384023 of because I use it all the time for cards and now it’s discontinued, waaaaaah!

It’s also raised up on some foam tape. It was a bit fiddly and took a while to get the fussy cut elements in their right places, and required the combined efforts of foam tape, glue dots, pritt stick, and double sided tape to get the job done.

21175903_10211685384903853_959627399_n

But that’s not the end! I always like to add something to the back and centre of my cards, even if it’s something small, just so you don’t have a beautiful front of a card and then stark white space elsewhere.

So inside I just added some washi tape:

21216221_10211685384623846_1267237523_o

For the back I did a little more, first I cut another paper to 6×6, and punched the corners with a fancy corner punch:

21245439_10211685384743849_709280911_n

Then embossed a ‘handmade with love’ stamp on top of some cut off paper I’d used for the front of the card, stuck a doily behind that, and there we go!

21222496_10211685384703848_1992108225_o

I always find adding something to the back and centre of your card (other than your message, of course), makes a handmade card seem more ‘finished’.

Thanks so much for reading, and look out for some more card posts soon 🙂

21175126_10211685384543844_1467182668_n

Oh I forgot – I added some flat back pearls too!

cropped-lets-see-if-this-works.png

Grace @ms.paperlover ❤

card making, follow friday, papercrafts, trimcraft

Follow Friday – Trimcraft / The Craft Blog

thumbnail_follow_friday_the_craft_blog_1

Just a short post today to share with you guys the wonderful company that is Trimcraft for #followfriday

Of course, everyone reading this probably already knows who and what Trimcraft are, as they’re responsible for well known brands such as First Edition, Dovecraft, and Simply Creative.

But as well as that The Craft Blog is an incredible source for any crafter – they have tips, tricks, processes, freebies, and giveaways. As well as the ‘inspiration‘ section where their design team, as well as anyone else registered on the site, can post pictures of their creations to share.

They also have a YouTube channel which has both great tutorials and fun videos showcasing the products.

Plus of course their instagram (make sure to watch their instagram stories!), Facebook, Twitter, and Pinterest.

opiouiyuf

Besides their amazing products, what I love about this company is how they really care about being creative and communicating and networking with fellow crafters. Not many other companies provide so many freebies, tutorials, or host so many competitions and giveaways (which yours truly has even won one of!), or make such efforts to stay in touch with their followers.

You may already follow them on instagram, or facebook; but make sure to check out the blog and the website if you don’t already, it really has so many amazing crafty resources.

oh, and P.S. – no I was not paid in paper pads or washi to create this post, I just genuinely love this company 😛

P.P.S – if you have a blog and/or YouTube channel and would like to be featured on a Follow Friday (you can be a regular person, you don’t have to be a craft company!) please contact me using the form on the menu above, or email mspaperlover@outlookcom

cropped-lets-see-if-this-works.png


Grace ❤ @ms.paperlover


card making, Christmas, papercrafts, trimcraft

Trimcraft Bloggers Event – Christmas in August!

With a good 40% of the items in my craftroom being Trimcraft, when I got an email from them inviting me to their bloggers event, I squealed. I definitely squealed, loudly.

IMG_4649

So on Saturday 5th August a small hoard of bloggers and vloggers descended into the Trimcraft HQ in Nottingham (fun fact, between 2012-2016 I lived ten minutes away from their HQ and never knew!). We were greeted with… Christmas. Just, the most Christmassy Christmas of the Christmasses! They must have worked so hard to do all that, so massive kudos to the Trimcraft staff for their decorating skills!

They treated us to food, drink, and goodies galore! Even kicking things off with a Christmas present for us all…

IMG_4618

We were then introduced to all the gorgeous Christmas ranges and collections for this year:

IMG_4633

Items from the collections were spread all over the tables, and we got our craft on. We got our craft on hard. There were four craft activities during the day, two of which were things I had never ever done before. We made Christmas wreaths with decoupage (patch? maché? I still don’t know which is which)

Next was a quick session of Christmas card making, something I am certainly familiar with!

Those are mine on the left and then a snap of the pile of cards made by everyone. The cards are being donated to a local charity 🙂

The last two were a Christmas cracker:

IMG_4628

And then we made felt tree decorations which I was just… shockingly awful at. Really, truly, hilariously, awful. So much so I don’t have a picture of it (but it is featured in all its grotesque glory in my video of the event, which I’ll have a link for lower down this post). But I had fun making it! And that’s what is important… right? (seriously it’s so bad it’s almost good!)

However, if you were interested in making your own, you can find free templates on Trimcraft’s blog, The Craft Blog.

Penguin

Cracker

Other Christmas Freebies

We also got to have a little nosy around their show room (called ‘Snow Room’ for the day, lolz). I nearly wept when I saw the display of First Edition Paper Pads:

IMG_4639


This slideshow requires JavaScript.

Unfortunately all good things must come to an end and so came home time. Though we did not go away empty handed, oh no no no. On our way out we were each presented with the most incredible goody bag featuring SO VERY MANY items from all the Christmas ranges this year. To see what is in the goody bag in detail you’ll have to watch my video, but here’s a photo of everything laid out:

IMG_4654

So a huge thank you to the Trimcraft staff for being the friendliest and most welcoming bunch of lovely people, and for all the hard work they put into the day. It was so much fun to meet new people and to craft away to your heart’s content using gorgeous new products and… not having to worry about cleaning up the mess afterwards!

IMG_4651
A “Craftermath”

I’ll have some Christmas crafts up here on the blog in the coming months, so keep an eye out for those.

And lastly, here’s the video I mentioned earlier, which includes a small amount of vlog footage from the day as well as a run through of all the items from the goody bag

cropped-lets-see-if-this-works.png


Grace ❤ @ms.paperlover

card making, how to, papercrafts, tutorial

Creative Process – A Teenager’s Birthday Card

When I make birthday (or anniversary or get well soon or whatever) cards, I don’t just make a load of generic cards and choose one for the recipient (though maybe I should, it would be far less time consuming), I really make them for that person; with them in mind. Their tastes, their aesthetic. And so on.

This card was for my eldest niece, for her fourteenth birthday. Being fourteen she needed something grown up enough, but also not too grown up (did that make sense? Probably not!). I chose the First Edition ‘Sweet Nothings’ paper pad by Trimcraft to make this card, as it has some seriously pretty papers in it.

IMG_3980

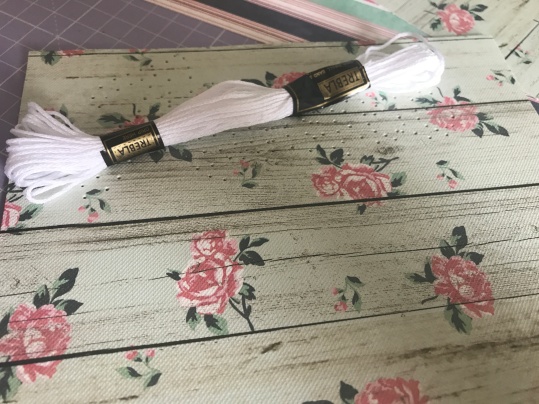
And the paper I chose for the base of my card is one of the textured papers with this beautiful wood and floral pattern on. I made the card 6×7″ (it needed to be slightly taller than 6″, you’re about to see why.

So I wanted to stitch my niece’s name onto the card. I printed off her name in one of my favourite fonts to stitch with (‘Beyond the Mountains’). This font does however often do this strange thing where it cuts off the bottom of some of the letters when you print so I filled in those bits with pencil.

I lined the template up to where I wanted it on my card and poked in the holes. If you’re new to paper stitching you can read my how-to on it here. Words are a little harder than shapes but it’s the same basic principle. Just make sure you have your printed template handy so you can use it for reference, sometimes all you can see is a load of holes and it’s hard to know what’s what.

I chose to stitch in white, as the cream thread I have is a bit of a yellow cream and so wouldn’t work with this card. But this turned out to be a bit of an error too as once the word was stitched it was quite hard to see. It shows up better on the picture above but in real life you had to squint to read it!

To solve this problem I decided to fill in the letters with some colour, using this ‘tea dye’ varnish, so that it would be a fairly subtle colour. As you may be able to see I did accidentally paint some of the thread, I don’t have a very steady hand, but it doesn’t matter too much!

Once that was all done and dry it was time to do the rest of the card. Whenever I’m doing a project like this I have a little root through my ephemera packs to see what I have to match, then throw it all into a little basket so it’s handy.

IMG_3989

Then, well, I stuck it on! I had a play around first, seeing what I wanted to put where, and I usually take a couple of photos on my phone to see what I like best. This is what I ended up with:

IMG_3990

It’s a mix of pieces from the cut-apart sheet from the Sweet Nothings paper pad, and some punch outs from it too. Then some random things I found in my ephemera root around!

The paper you can just see behind the card is what I used to line the inside. Because of the stitching on the front I had to cover up the mess of washi tape and knots that was behind it! IMG_3991

Being a teenager, my niece wanted money and make up for her birthday. I’d already wrapped the make up I’d bought her but I also made a little cash envelope using my WE R MEMORY KEEPERS 123 punch board. Which I stuck down with a velcro dot on the inside of the card so it would be easy for her to remove.

IMG_3993

I also wrote ‘for you’ on a black label with an embossing pen and embossed it with gold powder.

On every card I make I emboss this ‘handmade with love’ stamp too for something to put on the back of the card.

IMG_3994

The last thing to do was to make an envelope, again using my 123 punch board. I chose what I thought was a suitable paper from the First Edition pad…IMG_3999

…and once it was punched I also did some simple decoration on the front of the envelope, adding her name with alpha stickers. Which I forgot to take a picture of, woops!

So there it is, one of my homemade, personalised cards. Because of the stitching, which can take an absolute age, the whole thing probably took me about 90 minutes. But I love making my cards really special for my family and close friends.

IMG_3992

Oh I forgot, I added some flat back pearls too! That’s it… I think!

Thanks so much for reading, let me know if you’d like to see more card making posts 🙂

cropped-lets-see-if-this-works.png


Grace ❤ @ms.paperlover